Friday, May 11, 2018

Compiling Sprites

Welcome back to another edition of the Downland 2 development blog.  I've made quite a significant amount of progress since my last blog.  I decided to slow down just a tad and add to the development blog.  We are nearing the actual programming of the game.

Since my last blog I have rendered some more graphics in the GIMP, found and converted some sound effects .WAV files and compiled almost all of the sprites.  I changed the tile set to incorporate the background of the cave walls.  I originally was going to make the tiles transparent and render them over the background.  Then I thought, "Why?"  It's just going to take more cycles to do both.  I combined them both.  This was we can stack blast the tiles from a buffer and directly onto the playing screen.  It will cost less cycles then drawing transparent tiles over a blank background.  I have provided an image of the new tile set below so you can compare to the one I showed in a previous blog.  The background colors of dark gray and black may still change.  I haven't decided yet.


Back to the subject at hand... compiling sprites!  As I mentioned before there are some sprite compiling programs out there.  One I have used before is Glen Hewlett's.  It's very very good and well designed.  It, like any other compiler, still needs manual modification in order to optimize the code for the shortest amount of cycles.  Since I have to extract each sprite from my graphics editor, save it as a bitmap, then process it through the compiler and then hand edit I decided to just stick with my current very manual method of compiling sprites.  It's hard to program an analysis of the image that accounts for EVERY scenario to make the compiling more efficient and optimized.  As I just stated my process is very manual and involves a lot of time.  It is definitely the least exciting part of our game development.  With that said there are several other methods and I am not claiming mine to be the best or even closely the best.  It is simply the method I use to get the results I desire.

Why compile sprites?  The CoCo 3 did not come with hardware sprite support.  Which some people feel is a downfall, but I beg to differ.  If you look at some other systems from around the same era that DID support hardware sprites they were VERY limited.  Size and color depth mainly were the limitations there.  So I like the fact that you CAN and SHOULD compile sprites on the Coco 3.

Another method is to store the images of your sprites in a buffer in memory and then copy to the screen as needed.  This is what Color BASIC does.  The downfalls are that it's slow and even slower if you involve transparencies.  Let's be honest, nobody wants to see a game with those random colored dots or rectangles around the sprites.  Another downside of buffered sprites is you typically have to use one palette slot (0 is easiest) to signify a transparent pixel.  It is okay in many situations and if your game is limited graphically, by all means use a buffer because you will save yourself a lot of time.  I on the other hand make very graphics intensive video games.  It's just what I like to do.  Writing a set of instructions to render those graphics to the screen is the fastest method, but consumes more memory.  There's always a trade-off somewhere as you will learn when we talk sound.

So what is a compiled sprite?  Quite simply it is a set of assembly instructions to render the graphics to the screen.  That's it and that is why it consumes more memory, but executes faster.  There are many different strategies to consider when compiling sprites as well.  Those strategies are decided on a per sprite basis or even a per LINE basis.  Sometimes you want to load a value (LD) directly into an accumulator (A or B) or address (X,Y) register.  And sometimes you will "stack blast".  Other times you will work left to right, right to left or even center to left and then back right.  You'll likely not even progress in line order.  It all depends on what I refer to the HEX map.

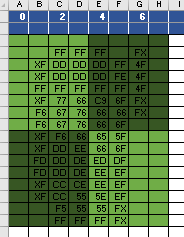
Take the image below of the DL2 dude standing still.  I take that right out of my graphic editor and byte by byte, line by line create a "HEX map" of the image in Excel.  You can see the HEX map of this guy right here to your right.  Let me explain the HEX map in a bit more detail.
I chose Excel because I can easily manipulate the size of each cell, color each cell accordingly (more on that in a moment), and also set the very top row to NOT scroll.  This is important so that I can scroll up and down as I do different sprites, but those values never move.

The top bar contains the offset of the sprite in relation to the current screen address I am working.  0, for example, is that actual address.  So let's say my screen is at $4000 (16,384 decimal).  If I write instruction STD ,U and register U is loaded with the value #$4000 the byte from register D would be stored at address $4000.  You'll see that I skip the numbering of the next byte and go to 2,4,6 and so on as needed.  Those are offsets from the original starting address.  And I skip the odd numbers just because it is less confusing to the eye.  With that I would STD 2,U and that would write the byte from D to address $4002 which is 2 away from U's current value of $4000.  Hopefully I made that easy to understand.

As you can see in the image of the HEX map I typically break the image map up into 4 equal sections and alternate colors.  It just visually makes it easier.  Trust me your eyes can become very blurred when doing this laborious task!  Visual aids are key.  At least for me.

Once I've established the address offsets in the top row and visually divided my sprite block up I will then go pixel by pixel, line by line through my image and write the hexadecimal values of each byte onto the grid.  Each byte is 2 pixels, at least in the graphics mode I use.  DL2 will be 256x200x16 graphics resolution.  So each cell contains the hex value for each byte of the sprite.  The X's mark where I will have to mix the sprite with the screen to create transparency.  As a hint, make the edge color of your sprite in palette slot 15 or F as this reduces the amount of steps necessary to create a transparency.  This was a trick I learned from my good buddy Glen Hewlett's blog. Glen's blog can be found here.

Once I have my hex map all setup, and I usually do multiple sprites on one Excel sheet, I am ready to start programming the compiling.  I have a .asm file I continuously use to compile my sprites.  You have to set up the palette, the screen mode and ALL of that stuff before you can compile IF you want to compile and run to visually verify your progress.  My compiler .asm file puts the Coco 3 into a 128x111 graphics mode.  The images are bigger and chunkier so I can see the details and easily identify mistakes.   I also will typically CLS my screen with a striped pattern so I can verify my transparencies are working.  I will provide screen shots along the way and I will also attach a copy of the .asm file for you.

As I compile I will generally compile and check about every 2-4 lines.  Sometimes more if my confidence level is high!  As I go I will highlight in Excel the bytes I have completed.  If I check and there are errors I will go back to Excel and highlight in red the line where the error occurred.  This helps me isolate that line of the HEX map and identify the changes I need to make in the code.  Inside the code editor I will group together the instructions for one line and then provide a space between each group.  This way if there are errors I can easily count lines.

Now let's get into the specifics of compiling THIS sprite.  You'll notice the top and bottom lines of the sprite contain a lot of "FF."  Which is black in my case.  As I mentioned earlier, making your sprite edges be F makes transparency mixing take less steps.  In this case I will like do the top and bottom lines first and then go back up to continue from the second line.  I will do this as it will reduce the amount of times I load the same values into registers.  Everything takes time!  It's your job to reduce that time as best you can.  You also don't want to load a value once and jump around to the various points it's needed because this will cost even more cycles.

So I'll start with this:

LEAU 256,U ;skip the first line as there is nothing there.  my screen width will be 256 bytes

LDB 6,U          ;load B with the value from U+6
ORB #$F0       ;OR B to mix the sprite.  $F is the value from the sprites edge, 0 will become
                        ;that nybbles value from the screen.  If the screen byte is $ED it will become $FD
STB 6,u          ;store the modified screen byte back at U+6

We'll take care of that one transparency first and then move onto this:

LDD #$FFFF ;load the value (value is indicated by #) of $FFFF into register D.
STD 2,U         ;I use U as my address pointer so I can stack blast if necessary
                        ;this instruction stores $FFFF at U+2 essentially
STB 4,U         ;Store the LSB of register D (register B, registers A+B=D) at U+4

LEAU 3584,U ;This adds 3584 to the value in U to "move" in this case to the bottom line of the sprite
                        ;why 3584?  My screen in DL2 will be set up to use the hardware scrolling mode
                        ;which enables a 256 byte wide virtual screen which you can scroll.
                        ;the bottom line is 14 lines down and the screen is 256 bytes wide
                        ;256x14=3584

This takes care of the first and second lines.  I chose to do the transparency first because then D is loaded with $FFFF upon exit to the next line.  This way we can start the next line with $FFFF without reloading the register.  Keep your eyes peeled for these opportunities as you go.  It will save you precious cycles!  Now I mark off what I've done in Excel and move on.


CODE:


I don't really see any opportunities where stack blasting is going to be more efficient for this particular sprite so I will address that later.

As I coded I ran a sample of my progress in VCC by compiling my code using LWASM and the windows command prompt.  I then drag and drop my program into the VCC emulator icon and it loads automatically.  I notice in my run that there as an error at the 13th line of the sprite.  I highlighted the error in red in Excel and went back into the code to fix the problem.  You can see below that one pixel that should be black is dark gray.


What's up with all the stripes man?  I have a loop at the end of my compiler program that cycles through all the colors in the border really quickly.  That signals that I'm not stuck in a loop somewhere and that the program is functioning as it should.  The stripes on the screen help me verify my transparencies are working properly.

After making the correction I finish the rest of the instructions and I now have my finished product!


As promised I have attached the code to this blog for your review.  I tried to comment as best I can.  I'm not really a commenter normally, but since I am sharing it's important you know what each line does.  There are probably things that other programmers will notice that could be better.  That's fine.  I know that, but please don't criticize.  I hope this entry has been informative and helpful!  Enjoy picking apart my code.

Next time I will talk more about what my plan is with the tiles.  Thanks again for reading!


Copy and paste this into Notepad or another .txt editor:

opt 6809

org $e00 ;program origin address (EXEC &HE00)

*disable interrupts
start orcc #$50

fast lds #$059f ;move stack to new place
sta $ffd9 ;high speed! CC3
sta $ffd7
;set all palettes black
ldu #black ;load address of label "black" into U
tst $ff02 ;wait for VSYNC
vsync0 tst $ff03
bpl vsync0
jsr setpal ;jump to set pallette sub routine

lda #$68 ;set up screen for graphics CC3
sta $ff90 ;mmu's set task1 CC3, $ff90 GIME init. register
ldd #$8272 ;64x112 screen byte resolution x16 colors
std $ff98 ;$ff98/ $ff99 are video mode/ resolution
;registers

ldd #$3233 ;move pages $32 and $33 into MMU space
std $ffa2 ;$ffa2 sets page at $4000
;$ffa3 sets page at $6000
;clear the screen with my chosen patterm
ldx #$4000 ;load X with screen start address
ldd #$0120 ;load D with my CLS value
cls std ,x++ ;store D @ screen address X
cmpx #$7fff ;check if we're at the bottom
blo cls ;clear more if we're not

ldd #$3031 ;move pages $30 and $31
std $ffa2 ;into $4000 and $6000

ldx #$4000 ;same as CLS above
ldd #$6789
cls0 std ,x++
cmpx #$7fff
blo cls0

ldd #$c000 ;point vertical offset register to page start at $30
std $ff9d ;page number * 4  $30*4=$c0
;$ff9e is like a "shift" register... so we leave it
;0 for now
;set palette to full 16 color RGB
palettergb ldu #rgb ;same as setting palette black above
tst $ff02
vsync2 tst $ff03
bpl vsync2
jsr setpal

lda #$80 ;enable HVEN
sta $ff9f

ldu #$4000 ;point U very top left of screen

jsr guy1 ;jump to sprite compiling

looper inc $ff9a ;increase the border color infinitely
jmp looper

opt cd ;enable cycle counting for output file
opt ct ;enable cycle count totalling

guy1 leau 256,u ;line 1

ldb 6,u ;line 2
orb #$f0
stb 6,u
ldd #$ffff
std 2,u
stb 4,u
leau 3584,u

std 2,u ;line 16
ldb 5,u
orb #$f0
std 4,u
leau -2816,u

ldb #$4f ;line 5
std 5,u
ldb #$ff
std 1,u
std 3,u
leau -512,u

ldb #$4f ;line 3
std 5,u
ldb #$dd
lda 1,u
ora #$0f
std 1,u
lda #$dd
std 3,u
leau 256,u

std 3,u ;line 4
lda 1,u
ora #$0f
std 1,u
ldd #$fe4f
std 5,u
leau 512,u

lda 1,u ;line 6
ldb 6,u
ora #$0f
orb #$f0
sta 1,u
stb 6,u
ldd #$c96f
std 4,u
ldd #$7766
std 2,u
leau 256,u

ldx #$f667 ;line 7
stx 1,u
lda 6,u
ora #$f0
sta 6,u
stb 5,u
lda #$76
std 3,u
leau 256,u

stx 1,u ;line8
std 3,u
lda #$6f
sta 5,u
leau 256,u

lda 1,u ;line 9
ora #$0f
sta 1,u
ldd #$f666
std 2,u
ldd #$655f
std 4,u
leau 256,u

lda 1,u ;line 10
ora #$0f
sta 1,u
ldd #$ddee
std 2,u
ldd #$666f
std 4,u
leau 256,u

ldx #$fddd ;line 11
lda #$df
stx 1,u
sta 5,u
ldd #$deed
std 3,u
leau 256,u

stx 1,u ;line 12
ldb #$ee
std 3,u
ldb #$ef
stb 5,u
leau 256,u

lda #$ee ;line 13
std 4,u
lda 1,u
ora #$0f
sta 1,u
ldd #$ccce
std 2,u
leau 256,u

ldb #$55 ;line 14
std 2,u
ldd #$5eef
std 4,u
lda 1,u
ora #$0f
sta 1,u
leau 256,u

lda 5,u ;line 15
ora #$f0
sta 5,u
ldd #$f555
std 2,u
stb 4,u


rts

black fcb 0,0,0,0,0,0,0,0,0,0,0,0,0,0,0,0 ;data for black
rgb fcb 3,24,27,48,54,34,52,4,32,11,5,40,63,56,7,0 ;data for RGB


setpal ldx #$ffb0 ;point X to palette registers
repal lda ,u+ ;load value from U pointer address into A
sta ,x+ ;store A where X points
cmpx #$ffc0 ;check if at end
blo repal ;do again if not
rts ;return to where we came from

end start ;end of program


Saturday, April 28, 2018

Toolset

Before beginning to flesh out your game you need to build your arsenal of tools that you will use for development.  A set of tools to aid you in development are as essential as concept and game play.  Without them the development process can become overwhelmingly tedious often resulting in lack of motivation.

In the old days when I first started developing (or trying to develop) games as I child the only tool I had was the BASIC programming language that came with CoCo.  The ability to create sound in BASIC paused processing of everything else.  This resulted in little to no time spent on developing background music or sound effects.  At least that was the case for me. I generally skipped over that part. Graphics was the main thing I could develop without incurring any real penalties to the user.  This process was very tedious in BASIC.

My first days of development were on the CoCo 3.  It's BASIC came with extended functions for the new high resolution screens.  We used to use a series of HDRAW commands as well as HSET, HPAINT, HLINE, and HPRINT to code in the "drawing" of our graphics to the screen.  Then we'd use the functions HGET and HPUT to store and pull graphics from the 8k (more like 7k for the BASIC user) buffer.  It often took hours to produce anything worth looking at AND in most cases there was a lot of settling or compromise as the HDRAW command has some flaws with the way it outputted to the screen.  I think a good portion of that can be attributed to the fact that each byte of data on the high resolution graphics screen (we always used HSCREEN2, 320x192x16 colors) was equivalent to 2 pixels as opposed to 1.  I never even knew that until I was much older.  In addition, when "putting" the graphics back on the screen there was no real good transparency solution using BASIC.

Once you completed "drawing" all of your graphics to the screen and storing them in the buffer you could start the real meat and potatoes... the program.  It's worth mentioning too that all of this "graphics processing" ate away at the RAM allocated to your BASIC program.  So you were working against yourself from the very start.   I remember it being pretty fun, but I also was 6 or so years old with no agenda whatsoever!

Programming in BASIC on the CoCo was simple.  You started each line with a number and entered in some commands/ functions that were pretty straight forward and easy to memorize.  PRINT, for example.  The name of the command pretty much hinted to you its function in one word.  The CoCo's programming editor was terrible by today's standards, but for the time it was alright.  The only thing I had to compare to at the time was the IBM PC Jr.'s BASIC that I played with at school.  It used the exact same keys for editing.

To edit you had to type EDIT insert line number here and press enter.  You could hit the right and left arrow keys to move the cursor left and right over the characters.  You could also use the search function "S" to "find" a certain character.  A number preceding the S would "jump" to the Xth occurrence of said character.  For example 3-S-C would find the 3rd instance of C and jump there.  Then you hit the C key to change the character.  There were a few other editing functions, but you get the general idea of how bad it was!

As I got older I developed my own tools for developing games or used other resources that were already created for me.  I was tired of the somewhat hokey results I got from hours of HDRAW's and made a very primitive sprite editor.  The program opened up with a large grid that's size was predetermined.  Next to that was a display of the actual image.  A palette was displayed somewhere and so on.  You used the arrow keys to move the cursor around in the grid and pressed SPACE or ENTER to set the current color on the grid and in the actual image.  This enabled you to be much more precise by setting pixels instead of using the HDRAW function.  This eventually evolved into a GUI type sprite editor that I still use to get ideas out, but I have even started leaving that one in the dust.  Here's an example of the standing frame of the new Downland 2 dude drawn using the latest evolution of my CoCo 3 sprite editor.
There was a rather NOT brief history of where my tools began and how I started as a developer.  A good graphics editor is one of the first essential tools needed to develop video games.  The graphics editor I use now is GIMP, which is an open source and free graphics editor originally developed for Linux systems.  It's nice because you can easily build a 16 color RGB palette and create images in the same resolution sizes as the CoCo 3.  You can even convert them into 16 color bitmaps (with dithering if you want) that are transferable to the CoCo 3.  More on that in later blogs.  I highly recommend GIMP if you can't afford Photoshop or other popular graphics editing programs.  Here's an example of a sprite and tile layout sheet for Downland 2 I created in GIMP.

As stated in my history, typically after creating graphics the programming begins.  I have no concept of programming assembly back in the CoCo's hayday, but I have used EDTASM.  I felt it's interface was worse than that of BASIC's as far as being user friendly.  So now, thanks to Lost Wizard and my good friend Simon, I write and edit my code right in Notepad on good ole Windoze.  I then use the Command Prompt and a little assembler called "LWASM" to assemble my code in seconds.  Then I drag and drop the compiled .BIN onto the VCC program in the folder and BAM! my program runs. 

There is definitely a downside to this and that is that the VCC emulator is very lenient when it comes to things working.  Often times something will work on the emulator that won't work on the real hardware.  This is mainly due to issues with the interrupt timer and that within the emulator ALL memory address are read/ write enabled. That is NOT the case on the real hardware.  Repair of those issues are currently in process.  If you're going to be a serious developer for the CoCo 3 and use some advanced assembly techniques I strongly suggest you also have a real machine for testing.  Your programs will blow things up if not!

I have not spent much time using a debugger.  Because of the way you can instantly compile and check most of the bugs are worked out as we go, but that has not always been the case.  We had an issue during "Timberman" where on MAME and real hardware a random gray pixel would show up on the title screen.  It was in different places on the screen depending on which system you ran it on.  VCC never showed, "the gray glitch of 2017."  My friend Simon ran the game through the MAME debugger and found that in some of my code for compiling the title sprite there was a stray instruction writing gray pixels to a screen memory address.  The game was nearly finished and rewriting the title compiling code would throw some things off.  So we made a patch at the beginning of the program to correct the problem.  Even though I don't have much experience with a debugger myself I strongly recommend a good debugger for solving problems like this and others.

I mentioned in the paragraph above, "...code for compiling the title sprite..."  Sprite compiling is key for a fast CoCo game.  Sprites are basically the graphic that depicts a character or object on the game screen.  There are generally 2 types of sprites.  Hardware and software.  When it comes to the CoCo hardware sprites do not exist, so software is your only option.  There are generally 2 ways (that I know) for storing and rendering sprites on the CoCo.  You can either use a buffer that you copy from OR you can compile your sprites.  Compiling is simply a set of instructions to "draw" the sprite directly to the screen.

I compile my sprites as it is the fastest method, but it takes more memory for storage. I do it manually.  It's slow and it's tedious, but the compiler programs I've used (although very well written and DO produce great compiled sprites!) do not produce the optimized solution without editing.  I found I was editing them a lot anyway so it seemed easier to just continue manually.  To do so I use a combination of GIMP, Excel and Notepad.  As stated above I use GIMP to create all of my graphics.  I will then take that into an Excel grid as a hexadecimal "map" of values that make up the graphics.  X's equal a nybble that needs to be masked with the background.  I'll then go line by line writing a series of assembly instructions to compile that graphic.  There are other methods I'm sure, but this is what I do.

 As I touched on previously, compiled sprites take a lot of memory.  In order to "pack" all of these graphics and sounds into a single loading .BIN file you have to use a compressor.  Again, Simon, introduced me to one known as Dzip.  You can take any type of file and compress it.  There is even decompression code written for 6809 assembly.  It's simple.  Compress the file using Dzip in the DOS command prompt.  Include it in you program assembly file and decompress as needed into RAM.  TO DO- Add link to Dzip download.

I won't talk much about HOW to produce sound on the CoCo or even how to use an Audio editing program here.  To make a good game on the CoCo you should use some background music and some sound effects.  One or the other is fine too!  In order to do so I recommend Audacity for editing and converting digital samples for sound effects.  It is free and does everything you need it to.

For creating background music we recommend OpenMT.  It's also free.  Essentially it is a sequencer that can output an audio map that you can throw right into your assembly program.  Insert sound engine and BOOM! you have background music.

The next tool is a work in process for me.  A tile editor.  All those cool tiles you made in GIMP should have a map for rendering sitting somewhere in your assembly program.  For my tile editor I intend to create a PC based program.  Basically you can select 1 of any of the tiles and place it on the grid.  The program will then store it's tile ID in a tile map.  This will be outputted to a file that is compatible with the assembler.  More on this as I get it created.

Most of you probably already knew that you needed a set of tools to develop video games, but perhaps you didn't know what they were.  There are more than what I've mentioned here, but for retro gaming these will get you to the finish line

Don't use a butter-knife to turn in that screw.  Hell, don't even use that old fashioned screw driver.  Get a 18v cordless drill and let IT do the work for you... unless of course the job doesn't call for it.  Knowing when and how to use each tool is just as essential as having the tool in your toolbox.  My example above with sprite compilers is a perfect example.  There are plenty of good ones available, but for my games needs I find it best to compile by hand.  In some cases too the buffering method was just fine and saved me a ton of work.  You will learn and adapt as you go, but this should provide a nice base to start with.  Thanks for reading.  There is a summarized list of tools below.

Graphics editor-  Use for generating/ editing and exporting all graphics.  We recommend GIMP.

Text editor- Use for writing and editing code.  Notepad is perfect for this.

6809 Assembler- Use to compile assembly code into binary program.  LW Asm works wonderfully!

Debugger- Use to analyze code and find out why things are messed up!  I hear MAME's is great.

Sprite compiler- Use one of these to make compiling your beautiful graphics master pieces in to fast drawing sprites.  Additionally editing will likely still be required.  Count your cycles and see!

Spreadsheet- Use to manually create a map of the hexadecimal values of graphic images. This is used to compile manually. Excel or Open Office are great examples.

Audio Editor- Use to record, edit and export audio for sound effects.  Audacity is awesome and it's free!

Compressor- Use to compress code.  Examples are graphics and audio.  Must have a decompessor that is compatible with 6809 assembly code.  We recommend Dzip.

Audio Sequencer-Use for creating and exporting code for background music.  OpenMT is a fine option.

Tile editor- Use to visually layout tiles to create a level.  Then this will be converted to data that can be interpretted by the assembler.  WIP on this one for us!  We challenge you to create your own!

Good old fashioned Color Computer-because they're sweet!  Oh... you'll need one for testing too!

Friday, April 27, 2018

Concept

"Downland" was a platformer originally released in 1983 on a ROM cartridge for the TRS-80 Color Computer series.  The game was released by Spectral Associates and licensed by Tandy, but written in assembly language by Michael Aichlmayr.

In "Downland", originally to be titled, "Cavern Climber", you play as a very Mario looking individual navigating through various cavern chambers in search of treasure and keys while climbing ropes, dodging drops of acid, boulders and some other hazards. When you pick up a key it will unlock new exits and occasionally those exits are located in a chamber you are not currently in.  You were given a timer at the start of each chamber.  If that timer ran to zero a very fast flying bat would appear to ruin your day, and most times it does!  The nice thing is that once you leave a chamber that chamber's timer slowly counts back up.  There are some puzzle elements to the game, but for the most part it is just straight forward. This game was one of my favorites as a child!
As a child I dreamed big of cool video games I could make for the Color Computer series, but my skills were limited to the BASIC programming language.  The Color Computers, CoCo from here on out, BASIC language was intertwined with its operating system and was VERY easy to use.  Unfortunately this particular BASIC used an interpreter to decipher and execute the code.  This was extremely slow.  Some BASIC's allowed the programmer to compile the code and then an executable would be made from there, which was much faster.  There's more information about how those 2 different approaches work on the deep-web! The bottom line is if you want to make a fast game using graphics and sound on a CoCo you better learn 6809 assembly language!

Once I became a teenager my interests shifted elsewhere so the CoCo became a thing of the past for me.  I never went beyond the BASIC programming language on the CoCo.  In my early 20's I started programming again, but used PC based languages and interfaces.  Video game development was a hobby and I made many programs.  Some were great others were not so great.

In my late 20's I stumbled upon a Color Computer 3 emulator and I started living my childhood all over again!  It wasn't until about 2-3 years ago (2015 into 2016) that my now close friend, Simon Jonassen, reached out to me and offered to teach me 6809 assembly.  I was super stoked as you can imagine because it was the vehicle by which I could finally make my dreams a reality.  As it turns out too the CoCo community is still extremely strong!  So I won't be the only one to enjoy the fruits of my labor.


Downland 2 is a video game I began development on a short time ago after my first assembly language release, "Timberman" for the CoCo 3.  It was a clone of the popular phone app game of the same name.  Downland 2 will be everything I imagined as playing the original "Downland" as a kid.  Full 16 color caverns that are larger than the originals.  There will be boulders, acid drops and the bat as in the classic, but I intend to add some other features as well to make the game a tad more interesting and fun.  In my next blog I will go over the toolset our team uses to develop modern-like games on a vintage system.  Once the toolset is established I will continue blogging the details of applying the those applications to the development of a game.

Thanks for reading and I hope these blogs will be informative!